

Build with a coding agent
npx @scalekit-inc/cli setupnpm install -g @scalekit-inc/cliscalekit setupPaste a task that names implementing-saaskit. For example:
Use implementing-saaskit to add login, sessions, and logout.SaaSKit — Hosted auth pages, managed sessions, secure logout. Purpose built. Simple where it counts
You’ll implement sign-up, login, and logout flows with secure session management and user management included. The foundation you build here extends to features like workspaces, enterprise SSO, MCP authentication, and SCIM provisioning.
Scalekit handles the complex authentication flow while you focus on your core product:
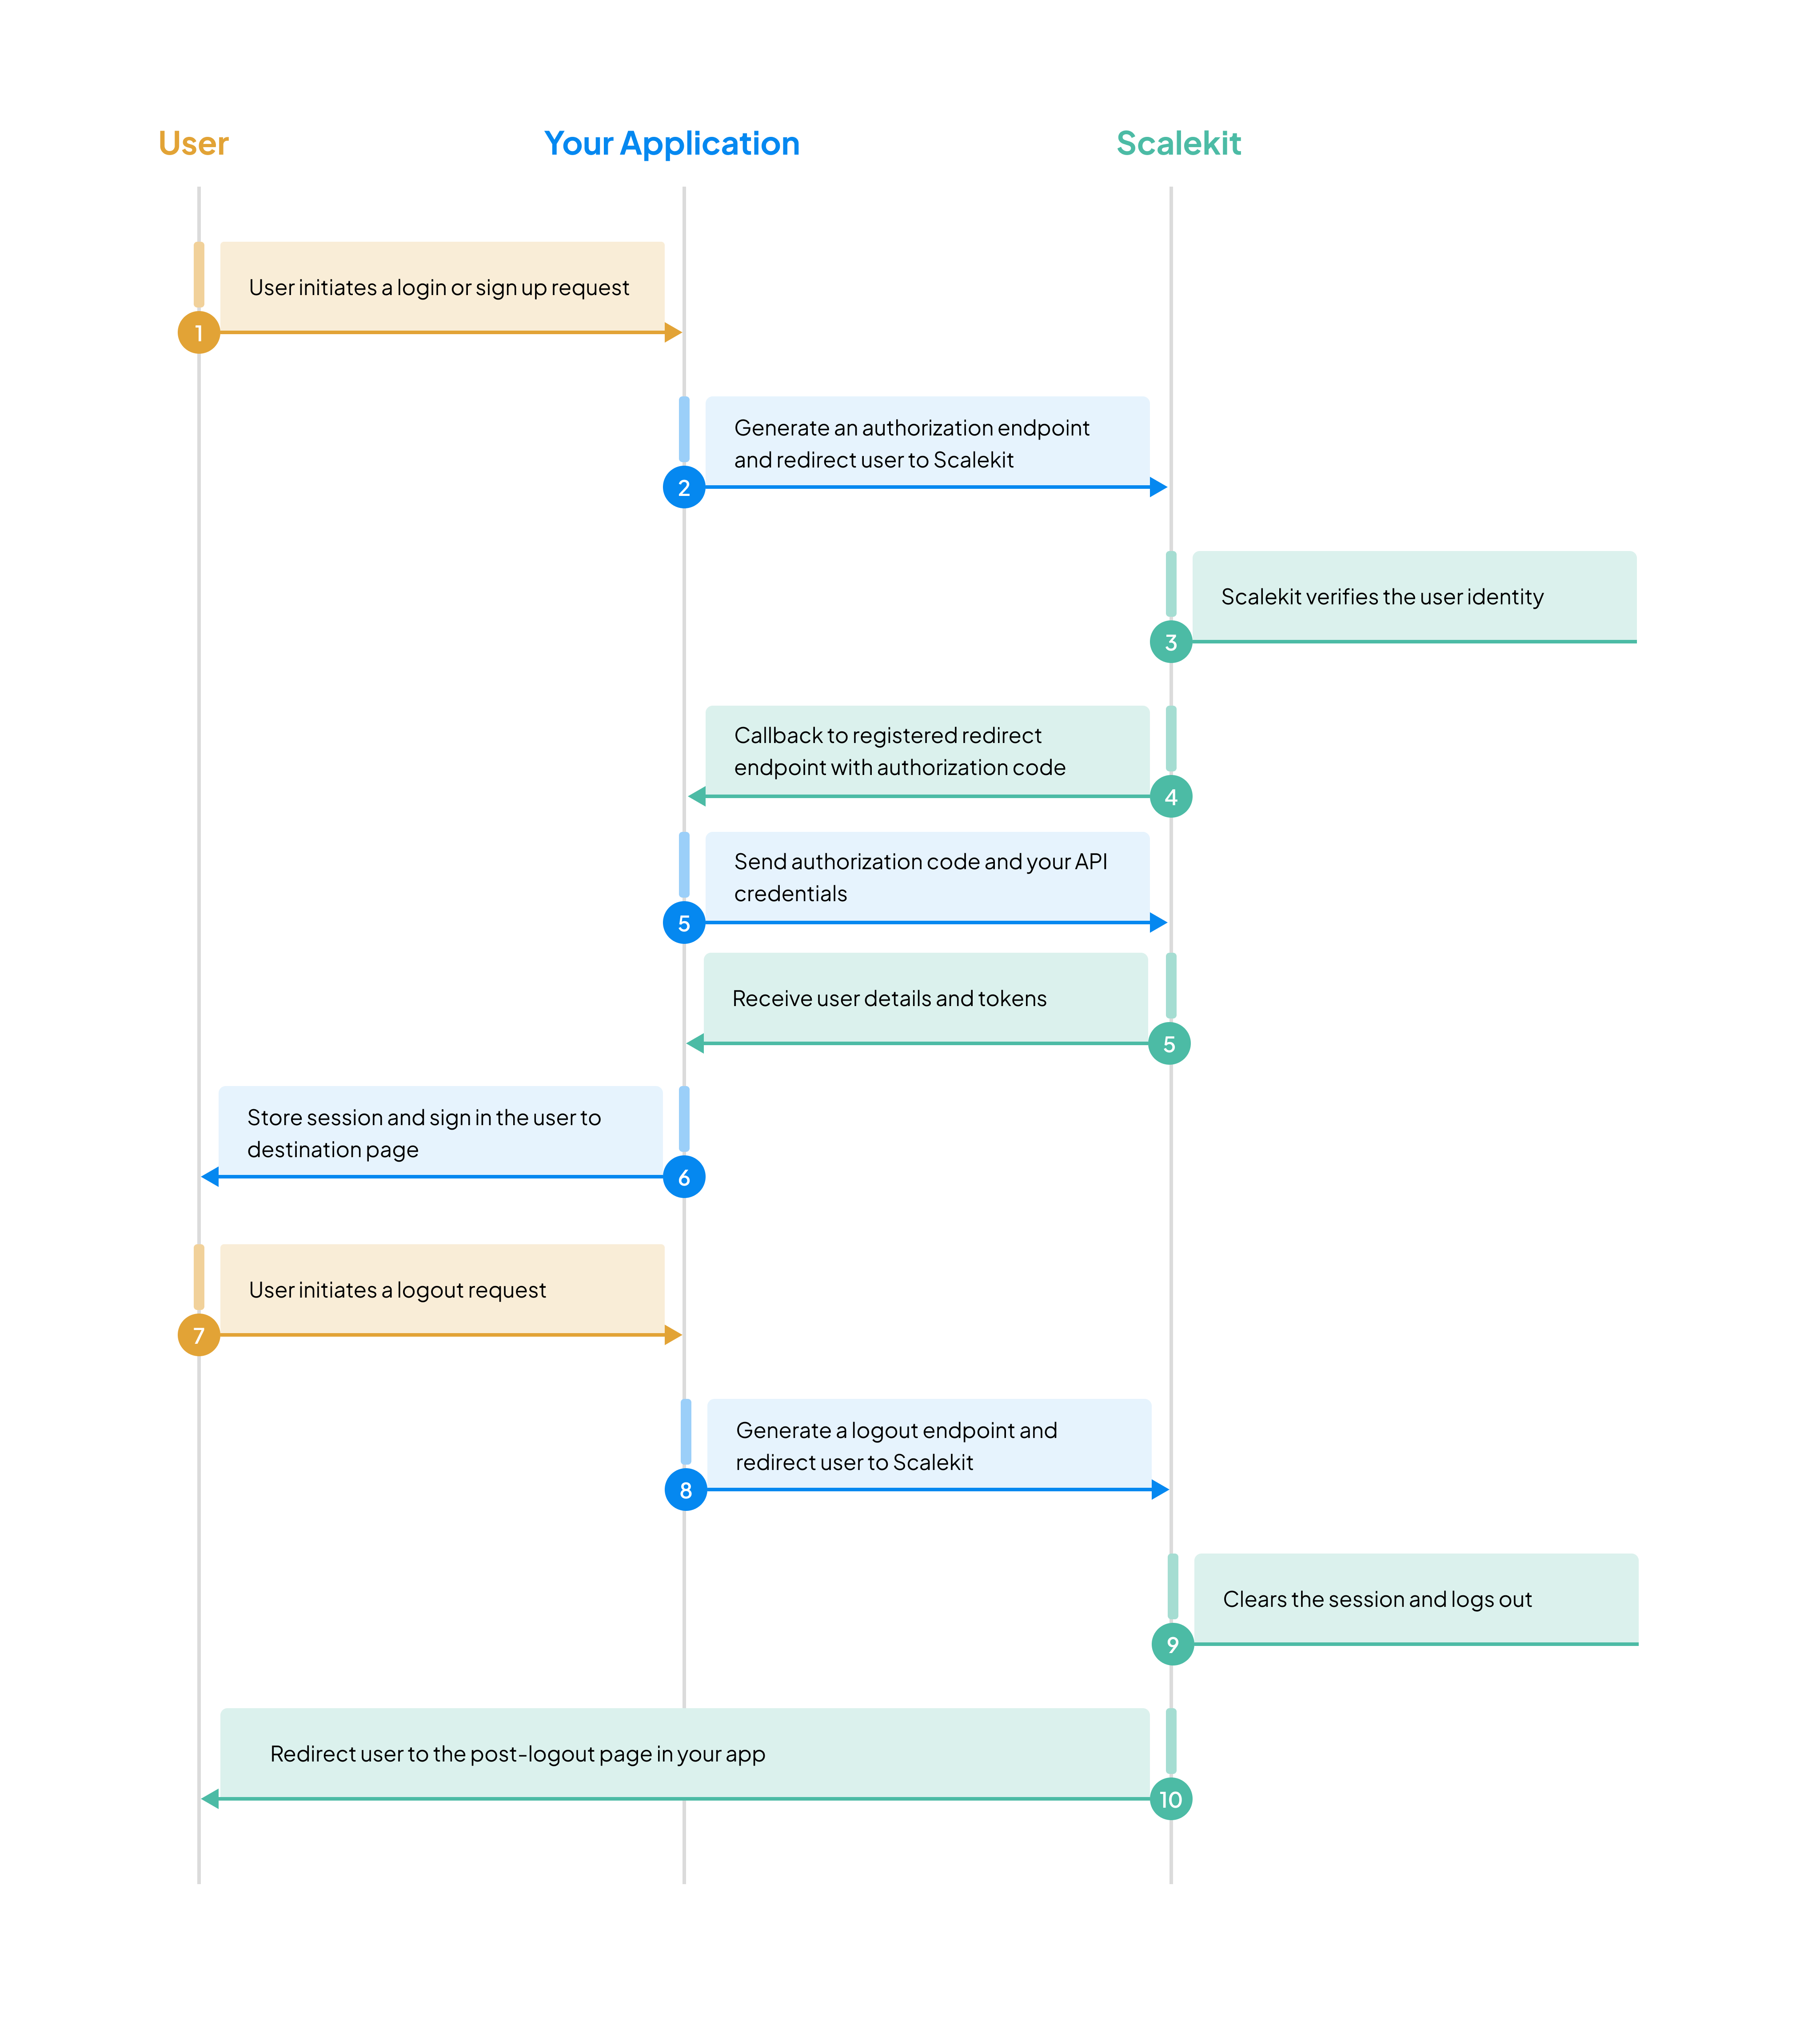
npx @scalekit-inc/cli setupnpm install -g @scalekit-inc/cliscalekit setupPaste a task that names implementing-saaskit. For example:
Use implementing-saaskit to add login, sessions, and logout.Use the following instructions to install the SDK for your technology stack.
npm install @scalekit-sdk/nodepip install scalekit-sdk-pythongo get -u github.com/scalekit-inc/scalekit-sdk-go/* Gradle users - add the following to your dependencies in build file */implementation "com.scalekit:scalekit-sdk-java:2.1.3"<!-- Maven users - add the following to your `pom.xml` --><dependency> <groupId>com.scalekit</groupId> <artifactId>scalekit-sdk-java</artifactId> <version>2.1.3</version></dependency>If you haven’t already, add your Scalekit credentials to your environment variables file:
SCALEKIT_ENVIRONMENT_URL=<your-environment-url>SCALEKIT_CLIENT_ID=<your-client-id>SCALEKIT_CLIENT_SECRET=<your-client-secret>COOKIE_ENCRYPTION_SECRET= # openssl rand -base64 32 — encrypts the session cookieREDIRECT_URI=http://localhost:3000/callbackYou need to register redirect URLs for your application. Go to Scalekit dashboard → Authentication → Redirect URLs and configure:
/authorize endpoint. Required when authentication is not initiated from your app, for example, when a user accepts an organization invitation or starts sign-in directly from their identity provider (IdP-initiated SSO). Learn moreAn authorization URL is an endpoint that redirects users to Scalekit’s sign-in page. Use the Scalekit SDK to construct this URL with your redirect URI and required scopes.
import express from 'express';import { ScalekitAuth } from '@scalekit-sdk/node/express';
const auth = new ScalekitAuth({ envUrl: process.env.SCALEKIT_ENVIRONMENT_URL, clientId: process.env.SCALEKIT_CLIENT_ID, clientSecret: process.env.SCALEKIT_CLIENT_SECRET, redirectUri: process.env.REDIRECT_URI, cookieEncryptionSecret: process.env.COOKIE_ENCRYPTION_SECRET,});
const app = express();app.use(auth.router);
app.get('/account', auth.requiresAuth, (req, res) => { res.json({ sub: req.scalekitUser?.sub });});
app.listen(3000);Open http://localhost:3000/account. A missing session goes to /login. After login, the visitor returns to /account. Register http://localhost:3000/callback as the dashboard Redirect URI.
import { ScalekitClient } from '@scalekit-sdk/node';import { ScalekitAuthNext } from '@scalekit-sdk/node/next';
const scalekit = new ScalekitClient( process.env.SCALEKIT_ENVIRONMENT_URL!, process.env.SCALEKIT_CLIENT_ID!, process.env.SCALEKIT_CLIENT_SECRET!);
export const auth = new ScalekitAuthNext({ client: scalekit, redirectUri: process.env.REDIRECT_URI!, cookieEncryptionSecret: process.env.COOKIE_ENCRYPTION_SECRET!,});import { auth } from '../../lib/auth';export const GET = auth.createLoginHandler();import { auth } from '../../lib/auth';export const GET = auth.createCallbackHandler();import { auth } from '../../lib/auth';export const GET = auth.createLogoutHandler();import { auth } from '../../lib/auth';
export const GET = auth.withAuth(async (request, { user }) => { return Response.json({ sub: user?.sub });});Open http://localhost:3000/account. A missing session goes to /login.
pip install "scalekit-sdk-python[flask]"import osfrom flask import Flaskfrom scalekit.frameworks.flask import ScalekitAuth
app = Flask(__name__)auth = ScalekitAuth( app, env_url=os.environ["SCALEKIT_ENVIRONMENT_URL"], client_id=os.environ["SCALEKIT_CLIENT_ID"], client_secret=os.environ["SCALEKIT_CLIENT_SECRET"], redirect_uri=os.environ["REDIRECT_URI"], cookie_encryption_secret=os.environ["COOKIE_ENCRYPTION_SECRET"], # HTTP localhost drops a Secure cookie, so the session never sticks. # A missing Secure flag on real HTTP lets the browser send sk_session in cleartext. cookie_secure=False,)
@app.route("/account")@auth.requires_authdef account(): return {"sub": auth.current_user["sub"]}
if __name__ == "__main__": app.run(port=3000)Open http://localhost:3000/account. A missing session goes to /login. Register http://localhost:3000/callback as the dashboard Redirect URI.
pip install "scalekit-sdk-python[fastapi]"import osfrom fastapi import Depends, FastAPIfrom scalekit.frameworks.fastapi import ScalekitAuth
app = FastAPI()auth = ScalekitAuth( env_url=os.environ["SCALEKIT_ENVIRONMENT_URL"], client_id=os.environ["SCALEKIT_CLIENT_ID"], client_secret=os.environ["SCALEKIT_CLIENT_SECRET"], redirect_uri=os.environ["REDIRECT_URI"], cookie_encryption_secret=os.environ["COOKIE_ENCRYPTION_SECRET"], # HTTP localhost drops a Secure cookie, so the session never sticks. # A missing Secure flag on real HTTP lets the browser send sk_session in cleartext. cookie_secure=False,)auth.install(app)
@app.get("/account")async def account(user: dict = Depends(auth.requires_auth)): return {"sub": user["sub"]}uvicorn app:app --port 3000Open http://localhost:3000/account. Register http://localhost:3000/callback as the dashboard Redirect URI.
// Must match the allowed callback URL you registered in the dashboardredirectUri := "http://localhost:3000/auth/callback"
// Request user profile data (openid, profile, email) and session tracking (offline_access)// offline_access enables refresh tokens so users can stay logged in across sessionsoptions := scalekit.AuthorizationUrlOptions{ Scopes: []string{"openid", "profile", "email", "offline_access"}}
authorizationUrl, err := scalekitClient.GetAuthorizationUrl(redirectUri, options)// Generated URL will look like:// https://<SCALEKIT_ENVIRONMENT_URL>/oauth/authorize?response_type=code&client_id=skc_1234&scope=openid%20profile%20email%20offline_access&redirect_uri=https%3A%2F%2Fyourapp.com%2Fcallbackif err != nil { // Handle error based on your application's error handling strategy panic(err)}
c.Redirect(http.StatusFound, authorizationUrl.String())import com.scalekit.internal.http.AuthorizationUrlOptions;import java.net.URL;import java.util.Arrays;
// Must match the allowed callback URL you registered in the dashboardString redirectUri = "http://localhost:3000/auth/callback";
// Request user profile data (openid, profile, email) and session tracking (offline_access)// offline_access enables refresh tokens so users can stay logged in across sessionsAuthorizationUrlOptions options = new AuthorizationUrlOptions();options.setScopes(Arrays.asList("openid", "profile", "email", "offline_access"));
URL authorizationUrl = scalekit.authentication().getAuthorizationUrl(redirectUri, options);// Generated URL will look like:// https://<SCALEKIT_ENVIRONMENT_URL>/oauth/authorize?response_type=code&client_id=skc_1234&scope=openid%20profile%20email%20offline_access&redirect_uri=https%3A%2F%2Fyourapp.com%2FcallbackThis redirects users to Scalekit’s managed sign-in page where they can authenticate. The page includes default authentication methods for users to toggle between sign in and sign up.
After successful authentication, Scalekit creates a user record and sends the user information to your callback endpoint. In authentication flow, Scalekit redirects to your callback URL with an authorization code. Your application exchanges this code for the user’s profile information and session tokens.
app.use(auth.router); // GET /callback writes sk_sessionimport { auth } from '../../lib/auth';export const GET = auth.createCallbackHandler();auth = ScalekitAuth(app, ...) # registers GET /callbackauth.install(app) # registers GET /callback17 collapsed lines
package main
import ( "log" "net/http" "os" "github.com/gin-gonic/gin" "github.com/scalekit-inc/scalekit-sdk-go")
// Create Scalekit client instancevar scalekitClient = scalekit.NewScalekitClient( os.Getenv("SCALEKIT_ENVIRONMENT_URL"), os.Getenv("SCALEKIT_CLIENT_ID"), os.Getenv("SCALEKIT_CLIENT_SECRET"),)
const redirectUri = "http://localhost:3000/auth/callback"
func callbackHandler(c *gin.Context) { code := c.Query("code") errorParam := c.Query("error") errorDescription := c.Query("error_description")9 collapsed lines
if errorParam != "" { c.JSON(http.StatusUnauthorized, gin.H{ "error": errorParam, "error_description": errorDescription, }) return }
// Exchange the authorization code for user profile and session tokens // Returns: User (profile info), IdToken (JWT with user claims), AccessToken (JWT with roles/permissions), RefreshToken options := scalekit.AuthenticationOptions{} authResult, err := scalekitClient.AuthenticateWithCode( c.Request.Context(), code, redirectUri, options,9 collapsed lines
)
if err != nil { log.Printf("Error exchanging code: %v", err) c.JSON(http.StatusInternalServerError, gin.H{ "error": "Failed to authenticate user", }) return }
user := authResult.User // IdToken: Decode to access full user profile (sub, oid, email, name) // AccessToken: Contains roles and permissions for authorization decisions // RefreshToken: Use to obtain new access tokens when they expire
// "user" object contains the user's profile information // Next step: Create a session and log in the user c.Redirect(http.StatusFound, "/dashboard/profile")}10 collapsed lines
import com.scalekit.ScalekitClient;import com.scalekit.internal.http.AuthenticationOptions;import com.scalekit.internal.http.AuthenticationResponse;import org.springframework.web.bind.annotation.*;import org.springframework.web.servlet.view.RedirectView;import org.springframework.http.ResponseEntity;import org.springframework.http.HttpStatus;import java.util.HashMap;import java.util.Map;
@RestControllerpublic class CallbackController {
private final String redirectUri = "http://localhost:3000/auth/callback";
@GetMapping("/auth/callback") public Object callback( @RequestParam(required = false) String code, @RequestParam(required = false) String error, @RequestParam(name = "error_description", required = false) String errorDescription ) {4 collapsed lines
if (error != null) { // handle error }
try { // Exchange the authorization code for user profile and session tokens // Returns: user (profile info), idToken (JWT with user claims), accessToken (JWT with roles/permissions), refreshToken AuthenticationOptions options = new AuthenticationOptions(); AuthenticationResponse authResult = scalekit .authentication() .authenticateWithCode(code,redirectUri,options);
var user = authResult.getIdTokenClaims(); // idToken: Decode to access full user profile (sub, oid, email, name) // accessToken: Contains roles and permissions for authorization decisions // refreshToken: Use to obtain new access tokens when they expire
// "user" object contains the user's profile information8 collapsed lines
// Next step: Create a session and log in the user return new RedirectView("/dashboard/profile");
} catch (Exception err) { // Handle exception (e.g., log error, return error response) } }}The authResult object contains:
user - Common user details with email, name, and verification statusidToken - JWT containing verified full user identity claims (includes: sub user ID, oid organization ID, email, name, exp expiration)accessToken - Short-lived token that determines current access context (includes: sub user ID, oid organization ID, roles, permissions, exp expiration)refreshToken - Long-lived token to obtain new access tokens{ user: { email: "john.doe@example.com", emailVerified: true, givenName: "John", name: "John Doe", id: "usr_74599896446906854" }, idToken: "eyJhbGciO..", // Decode for full user details
accessToken: "eyJhbGciOi..", refreshToken: "rt_8f7d6e5c4b3a2d1e0f9g8h7i6j..", expiresIn: 299 // in seconds}{ "at_hash": "ec_jU2ZKpFelCKLTRWiRsg", "aud": [ "skc_58327482062864390" ], "azp": "skc_58327482062864390", "c_hash": "6wMreK9kWQQY6O5R0CiiYg", "client_id": "skc_58327482062864390", "email": "john.doe@example.com", "email_verified": true, "exp": 1742975822, "family_name": "Doe", "given_name": "John", "iat": 1742974022, "iss": "https://scalekit-z44iroqaaada-dev.scalekit.cloud", "name": "John Doe", "oid": "org_59615193906282635", "sid": "ses_65274187031249433", "sub": "usr_63261014140912135"}{ "aud": [ "prd_skc_7848964512134X699" ], "client_id": "prd_skc_7848964512134X699", "exp": 1758265247, "iat": 1758264947, "iss": "https://login.devramp.ai", "jti": "tkn_90928731115292X63", "nbf": 1758264947, "oid": "org_89678001X21929734", "permissions": [ "workspace_data:write", "workspace_data:read" ], "roles": [ "admin" ], "sid": "ses_90928729571723X24", "sub": "usr_8967800122X995270", // External identifiers if updated on Scalekit "xoid": "ext_org_123", // Organization ID "xuid": "ext_usr_456", // User ID}The user details are packaged in the form of JWT tokens. Decode the idToken to access full user profile information (email, name, organization ID) and the accessToken to check user roles and permissions for authorization decisions. See Complete login with code exchange for detailed token claim references and verification instructions.
The access token is a JWT that contains the user’s permissions and roles. It expires in 5 minutes (default) but can be configured. When it expires, use the refresh token to obtain a new access token. The refresh token is long-lived and designed for this purpose.
The Scalekit SDK provides methods to refresh access tokens automatically. However, you must log the user out when the refresh token itself expires or becomes invalid.
app.get('/account', auth.requiresAuth, (req, res) => { res.json({ sub: req.scalekitUser?.sub });});import { auth } from '../../lib/auth';
export const GET = auth.withAuth(async (request, { user }) => { return Response.json({ sub: user?.sub });});@app.route("/account")@auth.requires_authdef account(): return {"sub": auth.current_user["sub"]}@app.get("/account")async def account(user: dict = Depends(auth.requires_auth)): return {"sub": user["sub"]}8 collapsed lines
import ( "net/http" "os")
// Set SameSite mode for CSRF protectionc.SetSameSite(http.SameSiteStrictMode)
// Store access token in HttpOnly cookie with Path scoping to API routesc.SetCookie( "accessToken", authResult.AccessToken, authResult.ExpiresIn-60, // seconds in Gin "/api", "", os.Getenv("GIN_MODE") == "release", true,)
// Store refresh token in separate HttpOnly cookie with Path scoped to refresh endpointc.SetCookie( "refreshToken", authResult.RefreshToken, 0, // No expiry for refresh token cookie "/auth/refresh", "", os.Getenv("GIN_MODE") == "release", true,)6 collapsed lines
import javax.servlet.http.Cookie;import javax.servlet.http.HttpServletResponse;
// Store access token in HttpOnly cookie with Path scoping to API routesCookie accessTokenCookie = new Cookie("accessToken", authResult.getAccessToken());accessTokenCookie.setMaxAge(authResult.getExpiresIn() - 60); // seconds in SpringaccessTokenCookie.setHttpOnly(true);accessTokenCookie.setSecure(true);accessTokenCookie.setPath("/api");response.addCookie(accessTokenCookie);
// Store refresh token in separate HttpOnly cookie with Path scoped to refresh endpointCookie refreshTokenCookie = new Cookie("refreshToken", authResult.getRefreshToken());refreshTokenCookie.setHttpOnly(true);refreshTokenCookie.setSecure(true);refreshTokenCookie.setPath("/auth/refresh");response.addCookie(refreshTokenCookie);response.setHeader("Set-Cookie", response.getHeader("Set-Cookie") + "; SameSite=Strict");This sets browser cookies with the session tokens. Every request to your backend needs to verify the accessToken to ensure the user is authenticated. If expired, use the refreshToken to get a new access token.
app.get('/dashboard', auth.requiresAuth, (req, res) => { res.json({ user: req.scalekitUser });});import { auth } from './lib/auth';
export default auth.createMiddleware({ publicRoutes: ['/'],});
export const config = { runtime: 'nodejs', matcher: ['/((?!_next/static|_next/image|favicon.ico).*)'],};@app.route("/dashboard")@auth.requires_authdef dashboard(): return {"user": auth.current_user}@app.get("/dashboard")async def dashboard(user: dict = Depends(auth.requires_auth)): return {"user": user}5 collapsed lines
import ( "context" "net/http")
// verifyToken is a middleware that ensures a valid access token or refreshes it if expired.func verifyToken(next http.HandlerFunc) http.HandlerFunc { return func(w http.ResponseWriter, r *http.Request) { // Retrieve the access token from the user's cookie cookie, err := r.Cookie("accessToken")4 collapsed lines
if err != nil { // No access token cookie found; reject the request http.Error(w, `{"message": "No access token provided"}`, http.StatusUnauthorized) return }
accessToken := cookie.Value
// Decrypt the access token before validation decryptedAccessToken, err := decrypt(accessToken)5 collapsed lines
if err != nil { // Could not decrypt access token; treat as invalid http.Error(w, `{"message": "Token decryption failed"}`, http.StatusUnauthorized) return }
// Validate the access token using the Scalekit SDK isValid, err := scalekitClient.ValidateAccessToken(r.Context(), decryptedAccessToken) if err != nil || !isValid { // Access token is invalid or expired
// Attempt to retrieve the stored refresh token refreshToken, err := getStoredRefreshToken(r)5 collapsed lines
if err != nil { // No refresh token is available; cannot continue http.Error(w, `{"message": "No refresh token available"}`, http.StatusUnauthorized) return }
// Use the refresh token to obtain a new access token from Scalekit tokenResponse, err := scalekitClient.RefreshAccessToken(r.Context(), refreshToken)5 collapsed lines
if err != nil { // Refresh attempt failed; likely an expired or invalid refresh token http.Error(w, `{"message": "Token refresh failed"}`, http.StatusUnauthorized) return }
// Save the new refresh token so it can be reused for future requests err = storeRefreshToken(tokenResponse.RefreshToken)5 collapsed lines
if err != nil { // Could not store the new refresh token http.Error(w, `{"message": "Failed to store refresh token"}`, http.StatusInternalServerError) return }
// Encrypt the new access token before setting it in the cookie encryptedNewAccessToken, err := encrypt(tokenResponse.AccessToken)5 collapsed lines
if err != nil { // Could not encrypt new access token http.Error(w, `{"message": "Token encryption failed"}`, http.StatusInternalServerError) return }
// Issue a new accessToken cookie with updated credentials31 collapsed lines
newCookie := &http.Cookie{ Name: "accessToken", Value: encryptedNewAccessToken, HttpOnly: true, Secure: true, Path: "/", SameSite: http.SameSiteStrictMode, } http.SetCookie(w, newCookie)
// Mark the token as valid in the request context and proceed r = r.WithContext(context.WithValue(r.Context(), "tokenValid", true)) } else { // The access token is valid; continue with marked context r = r.WithContext(context.WithValue(r.Context(), "tokenValid", true)) }
// Pass the request along to the next handler in the chain next(w, r) }}
// dashboardHandler demonstrates a protected route that requires authentication.func dashboardHandler(w http.ResponseWriter, r *http.Request) { w.Header().Set("Content-Type", "application/json") w.Write([]byte(`{ "message": "This is a protected route", "tokenValid": true }`))}
// Usage example:// Attach middleware to the /dashboard route:// http.HandleFunc("/dashboard", verifyToken(dashboardHandler))6 collapsed lines
import javax.servlet.http.HttpServletRequest;import javax.servlet.http.HttpServletResponse;import javax.servlet.http.Cookie;import org.springframework.web.servlet.HandlerInterceptor;
@Componentpublic class TokenVerificationInterceptor implements HandlerInterceptor { @Override public boolean preHandle( HttpServletRequest request, HttpServletResponse response, Object handler ) throws Exception { try { // Get access token from cookie String accessToken = getCookieValue(request, "accessToken"); String refreshToken = getCookieValue(request, "refreshToken");
// Decrypt the tokens String decryptedAccessToken = decrypt(accessToken); String decryptedRefreshToken = decrypt(refreshToken);
// Use Scalekit SDK to validate the token boolean isValid = scalekit.authentication().validateAccessToken(decryptedAccessToken);
// Use refreshToken to get a new access token AuthenticationResponse tokenResponse = scalekit .authentication() .refreshToken(decryptedRefreshToken);
// Update the cookie with the new access token and refresh token String encryptedNewAccessToken = encrypt(tokenResponse.getAccessToken()); String encryptedNewRefreshToken = encrypt(tokenResponse.getRefreshToken());
Cookie accessTokenCookie = new Cookie("accessToken", encryptedNewAccessToken); accessTokenCookie.setHttpOnly(true); accessTokenCookie.setSecure(true); accessTokenCookie.setPath("/"); response.addCookie(accessTokenCookie);
Cookie refreshTokenCookie = new Cookie("refreshToken", encryptedNewRefreshToken); refreshTokenCookie.setHttpOnly(true); refreshTokenCookie.setSecure(true); refreshTokenCookie.setPath("/"); response.addCookie(refreshTokenCookie);
return true; } catch (Exception e) { // handle exception } }13 collapsed lines
private String getCookieValue(HttpServletRequest request, String cookieName) { Cookie[] cookies = request.getCookies(); if (cookies != null) { for (Cookie cookie : cookies) { if (cookieName.equals(cookie.getName())) { return cookie.getValue(); } } } return null; }}Authenticated users can access your dashboard. The app enforces session policies using session tokens. To change session policies, go to Dashboard > Authentication > Session Policy in the Scalekit dashboard.
Session persistence depends on the session policy configured in the Scalekit dashboard. To log out a user, clear local session data and invalidate the user’s session in Scalekit.
<a href="/logout">Log out</a>import { auth } from '../../lib/auth';export const GET = auth.createLogoutHandler();<a href="/logout">Log out</a>8 collapsed lines
package main
import ( "net/http" "github.com/gin-gonic/gin" "github.com/scalekit-inc/scalekit-sdk-go")
func logoutHandler(c *gin.Context) { // Clear all session data including cookies and local storage clearSessionData()
// Generate Scalekit logout URL options := scalekit.LogoutUrlOptions{ IdTokenHint: idToken, PostLogoutRedirectUri: postLogoutRedirectUri, } logoutUrl, err := scalekitClient.GetLogoutUrl(options) if err != nil { c.JSON(http.StatusInternalServerError, gin.H{ "error": "Failed to generate logout URL", }) return }
// Redirect to Scalekit's logout endpoint // Note: This is a one-time use URL that becomes invalid after use c.Redirect(http.StatusFound, logoutUrl.String())}5 collapsed lines
import com.scalekit.internal.http.LogoutUrlOptions;import org.springframework.web.bind.annotation.*;import org.springframework.web.servlet.view.RedirectView;import java.net.URL;
@RestControllerpublic class LogoutController {
@GetMapping("/logout") public RedirectView logout() {
clearSessionData();
LogoutUrlOptions options = new LogoutUrlOptions(); options.setIdTokenHint(idToken); options.setPostLogoutRedirectUri(postLogoutRedirectUri);
URL logoutUrl = scalekit.authentication() .getLogoutUrl(options);
// Note: This is a one-time use URL that becomes invalid after use return new RedirectView(logoutUrl.toString()); }}The logout process completes when Scalekit invalidates the user’s session and redirects them to your registered post-logout URL.
This single integration unlocks multiple authentication methods, including Magic Link & OTP, social sign-ins, enterprise single sign-on (SSO), and robust user management features. As you continue working with Scalekit, you’ll discover even more features that enhance your authentication workflows.